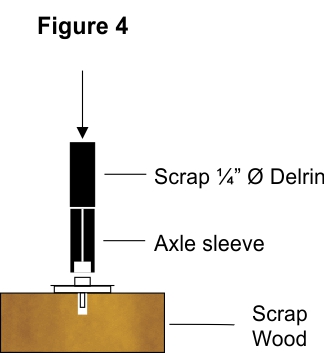
Ref. Figure 4.
Take a piece of scrap wood (e.g. 1" x 2") and drill a 0.060" hole into it at least 0.140" deep. Insert the non-geared driver into the hole. Take a piece of scrap Delrin and insert it into the chuck of a small drill press. Align the newly fabricated axle sleeve on top of the driver boss keeping it as vertical as possible.
Position the scrap Delrin piece over the newly fabricated axle sleeve keeping everything as vertical as possible and gently push down onto the driver, all the way until the boss on the driver is completely covered. Paying attention to keeping everything vertical and aligned will assure smooth running drivers. OK, start breathing again.
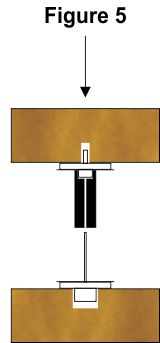
Ref. Figure 5.
Take another piece of scrap wood (e.g. 1" x 2") and drill a 0.360" hole into it at least 0.340" deep. Insert the geared driver into the hole with its axle pointing straight up.
Position the newly fabricated axle sleeve and place it over the axle keeping everything as vertical as possible. Take the same piece of scrap wood you used in Figure 4 and bring the drill press chuck down on it with its chuck wide open. Making sure that everything is vertical, press the assembly down onto the axle. As it feeds in, use an NMRA track gauge check the gauge of the drivers frequently and stop when the drivers are scale 36" apart.
If you go to far, don't worry just take the assembly in both hands and gently twist the drivers apart (this is one of the exceptional qualities of Delrin) and repeat the previously described procedure until the drivers are a scale 36" apart.
Now take the newly converted wheel set and roll it down a length of 3' gauge track. It should roll smoothly and do so without any driver wiggle. If it does, give yourself a pat on the back and repeat the above on the remaining three axle sets. When this is done, you'll have four electrically isolated, On3 wheel sets.
If the wheel sets wiggle, check the sleeve as it may be necessary to re-fabricate it and/or clean the drivers and their bosses.
The following photograph is of a newly assembled truck and it shows the non-geared side frame 0.080" spacer installed on the front truck. Note that this spacer widens the trucks by 0.080" - 0.020" = 0.060". Also visible are the axle sleeves and the new NWSL bevel gears on the drive shaft the right. For photographic visibility, I have turned the truck upside down.
When assembling the non-geared side frame with the bolster, replace the original washer (part number 00N04) with the new part part that you fabricated in Figure 2.
Notice that the side-frame screw cover and brake beams are missing, these will be installed later after break-in.
.jpg)
When assembling the geared side frame, insert the the new spacer part that you fabricated in Figure 3.
The photograph below shows the geared-side, side frame 0.040" spacer installed. Again, the truck is shown up side down.
.jpg)
Make sure that the geared-side, side frame is correctly aligned and tighten the side frame screw (part number 10213). Align the spring pickup wires (part numbers MT013 and MT014), tighten the screw (part number 10033) that holds the side frame and the spring pickup wires. Loosen the non geared side frame screw and roll the truck on a flat surface. Make sure that all four drivers touch the flat surface and tighten the remaining side frame screws.
The next step is to reinstall the horizontal drive shaft. Either reinstall the stock drive shaft or perform the NWSL bevel gear upgrade as described in the 2014 On30 Annual. After the drive shaft is reinstalled into the truck, snap the journal covers (part number 00N01) back into the truck in order to complete the reinstallation.
One completed truck, for this locomotive, one more to go.
Click here for part 4.
 or here
  to return to Chris' On3 home page.