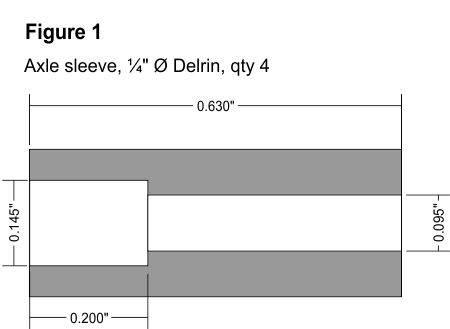
Ref. Figure 1.
I used ¼" Ø (diameter) black Delrin® rod and fabricated the sleeves by using a small jewellers lathe (I used a Sherline model 4500). For the 4 axle sleeves, the 0.095" and the 0.145" Ø holes in the center of the Delrin are critical as they allow for a tight interference fit.
Once the 0.095" Ø hole has been drilled in the Delrin rod, change the bit to something like a 0.125" Ø bit, start the lathe and just touch the end. This will provide an accurate "lead in" later on when we insert the axle. Reverse the work piece in the chuck and drill the 0.145" Ø hole 0.200" deep. Drill a very short lead-in on the 0.145" Ø end by using a larger bit.
Since we are using Delrin, be aware that it cannot be painted or glued so using a black material that "hides" the sleeve's and accurate interference fits are vital… [an error occurred while processing the directive]
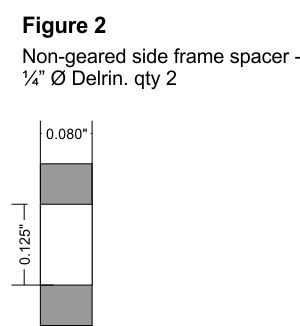
Ref. Figure 2.
Use the ¼" Ø black Delrin rod and fabricate the non-geared side, side frame spacer.
Once we're finished, this spacer will widen the trucks by 0.060". This takes into account that we're going to discard washer (part number 00N04) which was 0.020" thick. Remember that in terms of overall width, we still have 0.040" to go.
Ref. Figure 3.
Next we switch to 0.040" sheet styrene to fabricate the geared-side, side frame spacer. No prizes for figuring out why 0.040" was chosen!
This spacer will widen the trucks by an additional 0.040" thus making a total of 0.100" which is what we need.
Use the small "dimples" on the inside of the geared side frame to determine the locations of the three holes. I'd recommend using sharp drill bits and a small drill press for the holes.
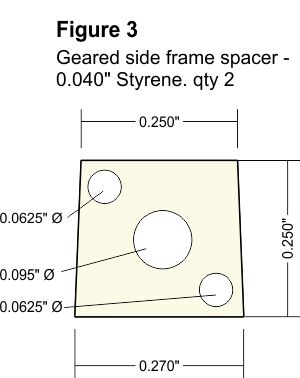
Initially, I made the spacer piece by carefully marking out the positions of the holes on a medium sized sheet of styrene with a sharp pencil then, I drilled the three holes. Next, I assembled the side frame, spacer and the bolster temporarily. I used a sharp pencil to outline the bolster shape to determine the spacer's final shape, disassemble and cut out the shape with a sharp X-Acto knife. It's much easier and more manageable this way.
One more tip, if using white styrene sheet, colour the visible parts of the spacer black with a Sharpie marker. This will render the spacer almost invisible when the truck is reassembled. Cool or what?
Click here to see part 3.
® Delrin is a registered trademark of E. I. du Pont de Nemours and Company (A.K.A. DuPont).
 or here
  to return to Chris' On3 home page.